

How to Attach Ledger Board on Siding
When laying out your new deck plans, the first thing on your installation list is the ledger. The ledger is a header that transfers the weight of the deck to the framing and foundation of your house. A ledger should be installed on concrete, brick, or a block, but what happens if the side of your house is covered in siding? First things first: never install a ledger on top of house siding. This is extremely dangerous and does not offer you any structural integrity. Instead, cut off a section of siding so ledger can be in complete contact with house. Make sure to install flashing under the siding, extending over the ledger, the flashing prevents the build up of moisture, which causes rotting.
Here are the steps to take when installing a ledger on a home with siding:

Mark the spot where you want the ledger to sit.
- Mark The Top Of The Ledger: Make a mark where the top of the deck should be, the mark should be 1-3 inches below that for the ledger.

Use a water level to ensure the ledger length is level.
- Mark The Ledger Length: Set a water level on mark done for the ledger board, then make another at a point longer than the length of the ledger. Do both sides like this, then snap a chalk line in the middle but add 1 ½ inches to the length of the ledger.

Check your lines to ensure everything is leveled and adjust if needed.
- Check for Level: Snap a chalk line between both ledger marks to ensure they are level.
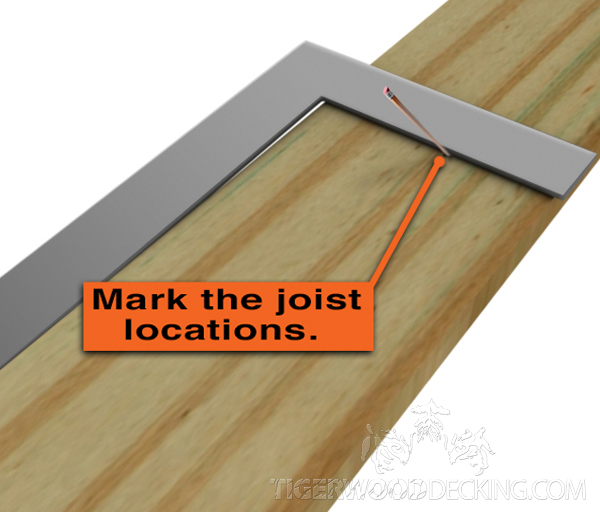
Make marks on the ledger where the joists will be situated.
- Mark Joist Locations: Make a mark on the ledger for the joist spacing. Spacing is usually 12 to 16 inches on center. Don’t forget to leave room for rim joists on the end of the ledger.
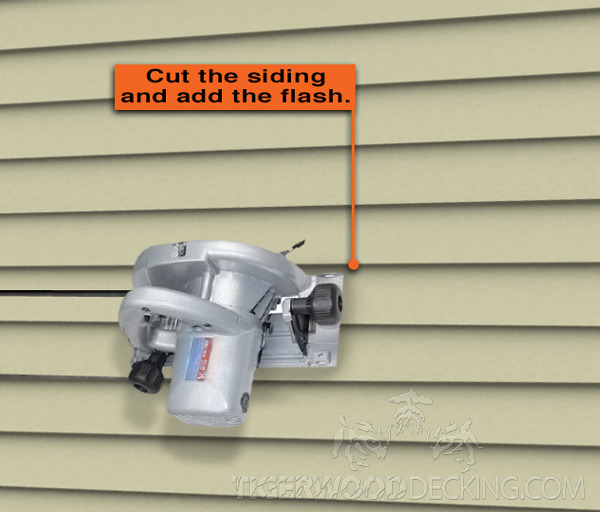
After cutting the siding with a circular saw, install the flashing.
- Cut Siding and Flash: First, ensure your circular saw is equal to the thickness of the deck, then cut the ledger outline. Slide the flashing underneath the siding 1 inch. Overlap flashing by 3 inches and cut it for the doorway.

Use a nail as a temporary place holder to check the ledger to see if it’s leveled.
- Level the Ledger: Place the ledger in the cut out area, ensuring it’s centered, and leave 1 ½ inches on each side for rim joists. Nail one end of the ledger with 10d nail or deck screw, keep in mind this is not the final fastener for the ledger, then level the other end and do the same.

Begin marking the positions for the fasteners.
- Mark for Fasteners: Starting around 2 inches from one end, mark fastener locations every 18 to 24 inches. It’s okay to have a fastener marked at a joist location.

Drill pilot holes for the lag bolts, these will be the final fasteners.
- Drill Pilot Holes: Start to drill the pilot holes into the ledger, at ¾ inch into studs, for the lag screws. Secure lag screws into the holes with a socket wrench.

After installation, it’s important to seal the ledger and the flashing to help prevent water damage.
- Seal the Edges: After allowing the ledger to settle overnight, securely fasten the screws a second time, but don’t over tighten. Seal the counterbores, the top of the flashing, and underneath the ledger with outdoor silicone caulk.
Installing a ledger may reduce your costs, but it’s time consuming and requires you to have a certain skill set. As always if you are unsure about decking installation, contact a local licensed contractor for the installation. You definitely don’t want to find yourself taking on more than you can handle.
To see how we can assist you in your next decking purchase, check out our extensive line of Tigerwood Decking products!


I’m putting a roof over my deck do I allow for my plywood and flashing when I make my line to cut the siding ? Or dose in really matter it’s only a a half inch or so